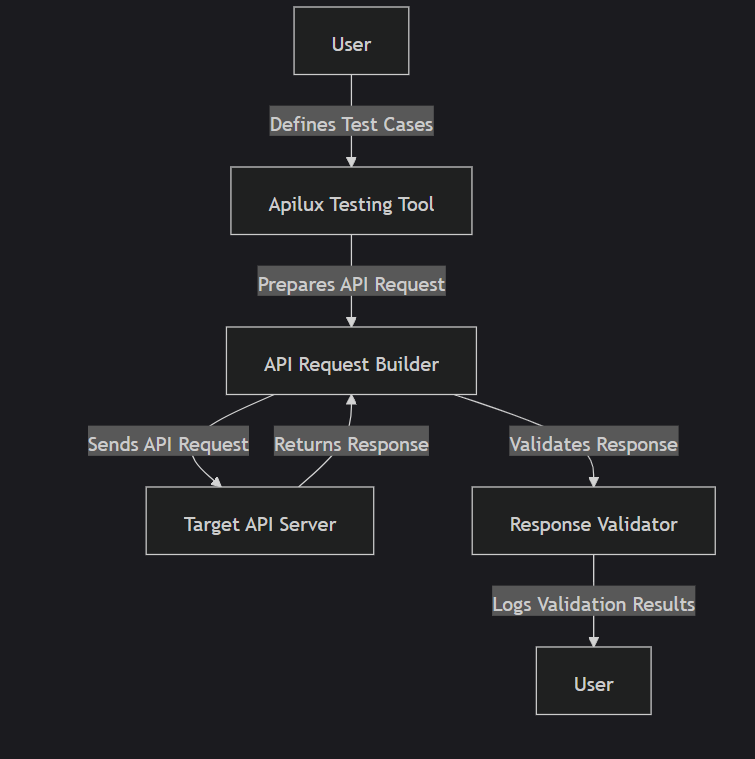
Internal Process Workflow
This document provides a detailed overview of the internal process workflow for using the Apilux API Testing Framework. It outlines the steps involved in defining test cases, preparing requests, sending them to the API, receiving and validating responses, and logging results. This guide is designed for internal users to understand how the framework operates at each stage of the API testing process.

1. Defining Test Cases (User Input)
The first step in the workflow is when the User interacts with the Apilux Testing Tool. In this step, users define the API test cases, specifying which API endpoints they need to test, the HTTP methods (GET, POST, PUT, DELETE), request parameters (headers, body), and the expected outcomes (status codes, response bodies, etc.).
Key Actions:
- API Endpoints: Users specify which API endpoints need to be tested.
- HTTP Methods: Users select the appropriate HTTP method for each test case (GET, POST, etc.).
- Request Parameters: Users configure headers, body data, and query parameters.
- Expected Results: Users define the expected response, such as status codes and response body content.
Example:
For testing a GET request on /api/products:
- Method: GET
- Expected Response:
- Status Code:
200 OK - Response Body: JSON array containing product data.
- Status Code:
2. API Request Preparation (Apilux Testing Tool)
After the user has defined the test cases, the Apilux Testing Tool takes this input and prepares the actual API requests. The tool ensures that all necessary components, such as headers, body data, authentication tokens, and query parameters, are included based on the test case details.
Key Actions:
- Request Composition: Apilux assembles the HTTP request with the proper headers, body, and authentication tokens (if applicable).
- Authentication: If the API requires authentication (e.g., API key or JWT), Apilux adds the necessary tokens.
- Request Method: Apilux sets the appropriate HTTP method (GET, POST, PUT, DELETE).
- Parameters and Payload: Apilux ensures that the request body and query parameters match the test case specifications.
Example:
For a POST request to create a new product on /api/products, the request might be prepared with:
- Headers:
Content-Type: application/json - Body:
{"name": "New Product", "price": 20.99} - Method:
POST
3. Sending and Receiving API Responses (API Server and Apilux Testing Tool)
Once the request is prepared, Apilux sends it to the Target API Server for processing. The API server processes the request, performs the necessary operations (e.g., querying the database, modifying data), and sends a response back to Apilux. The response is then captured by Apilux for validation.
Key Actions:
- Send Request: Apilux sends the HTTP request to the target API server.
- Process Request: The API server processes the request and executes the necessary business logic.
- Receive Response: Apilux receives the response from the API server, which includes the status code, response body, and headers.
Example:
For a GET request to /api/products, the API might return:
- Status Code:
200 OK - Response Body:
{"products": [{"id": 1, "name": "Product 1"}]}
4. Validation and Logging Results (Apilux Tool and User)
Once the response is received, Apilux performs validation based on the test case criteria. This validation ensures that the response matches the expected values for status codes, response bodies, and headers. The results of the validation are logged, and the user is notified whether the test has passed or failed.
Key Actions:
- Response Validation: Apilux compares the response against the expected results. It checks the status code, response body structure, and headers.
- Log Results: Apilux logs the results, marking the test as either Pass or Fail.
- Display Results: The results are displayed to the user, either in the UI or stored in a log file for further review.
Example:
If the response from /api/products matches the expected result:
- Actual Status Code:
200 OK - Expected Status Code:
200 OK - Actual Response Body:
{"products": [{"id": 1, "name": "Product 1"}]} - Expected Response Body:
{"products": [{"id": 1, "name": "Product 1"}]}
The test passes and is marked as Pass.
If there's a discrepancy:
- Actual Status Code:
200 OK - Expected Status Code:
404 Not Found
The test fails and is marked as Fail.
Overall Workflow Summary:
The entire Apilux API Testing Framework workflow is as follows:
- User defines test cases: The user specifies the API endpoints, HTTP methods, expected responses, and additional request details.
- Apilux prepares the request: The Apilux Testing Tool assembles the request with all necessary headers, body data, and authentication.
- Request sent to API server: Apilux sends the request to the target API server and receives the response.
- Validation and results logging: Apilux validates the response against the test case specifications and logs the result (Pass/Fail), displaying it to the user.